Step by step on how to flip an image in Google docs
We all know the working of word files, but most of the time, we forget to save or pc shut down without saving, and we lost our unsaved document, and hence it is preferred to write on Google Docs. It keeps all your writing online. We can also add images in Google Docs. Sometimes, when we copy and paste the picture, it automatically flips like a mirror image. If you are looking for the same answer, today we are here with a guide on how to flip an image in Google docs with a step-by-step guide.
Note down that filliping and rotation of images is an entirely different thing. When you rotate an image, it changes its side from up to down or right to left, but when you flip the picture, it flips vertically or horizontally. and If you want to do the same, follow this guide on how to flip an image on google docs. Let’s start.
Recommended: Print Test Page Online – Test Printer Setting Online

How To Flip An Image In Google Docs: A Detailed Guide
Step 1: Open the Google docs document in which you want to flip the image.

Step 2: Click on the image and select it.

Step 3: On the selection of the image, you will see an edge around it.
Step 4: When you can see it, right-click on the image and choose the copy option from the menu. You can also press Ctrl+C to copy the image from the keyboard.

Step 5: Place the cursor and press enter together until you move to the new blank page at the end of the picture.
Step 6: Now the image is copied to your clipboard. Put the cursor on the new page and click on the insert option from the top of the page.
Step 7: Now, go to Insert >> Drawing >> New. It will open a Google Docs Drawing tool.

Step 8: Next, right-click on plain space on the drawing tool and press paste. You can paste from the keyboard by pressing Ctrl+V together.

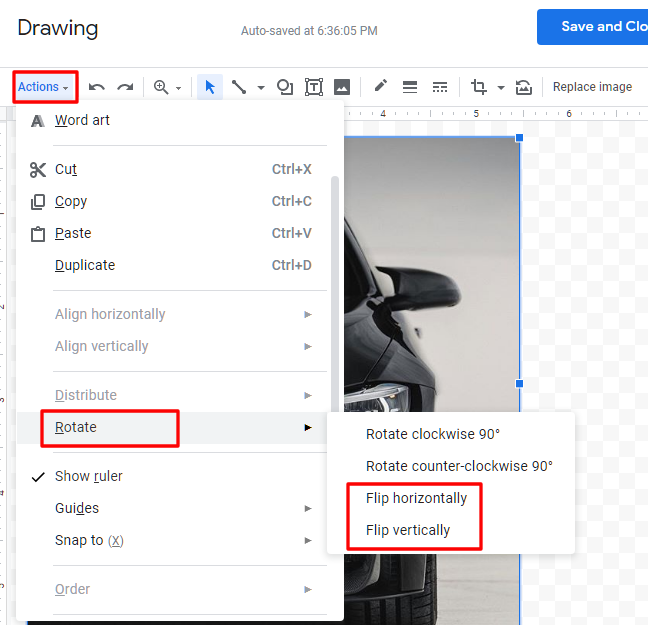
Step 9: Now, it’s time to flip the image on your Google Docs. Click on the action tab, and you can see a drop-down menu.

Step 10: From the menu, chose to rotate and then select Flip horizontally or flip vertically option.

Step 11: According to the option you have picked, the image will flip accordingly. For example, if you choose Flip horizontally, the left side of the image becomes the right and vice versa.
Step 12: Click on and close the file.
After going through the steps, you must get an idea about how to flip a picture on google docs. Note that your file is saved on google cloud. You can access the file on any device by login into your Gmail account.
Conclusion
It is all about how to flip an image in Google Docs. The process is quite easy, and it won’t take too much time to go through steps. Also, you can quickly memorize the steps for the next files. Hopefully, this guide with images helps you. What do you say? Share your views about this post in the comment box below. You are free to ask the doubts related to this post. The comment section is all yours. Thank you.
Related Post:

